


Hey there! I’ve been busy in the studio and thought I’d share a work in progress that just came out of the kiln! And yes lol, it’s meant to be in two halves — it opens!
Here’s a video of it that I posted on Instagram:
View this post on Instagram
Right now I’m calling it “Heartfelt Values” but that could change as it evolves. I actually started out with a very different concept – a heart yes, but for very different reasons than its current purpose. Now I’m going to add some additional pieces to give it context – I bet you can’t guess what I’m adding?
I’m also excited about the stand I’m making for it, out of a completely different material. Stay tuned for updates, and for my full artist’s statement on the piece. It’s going to fit nicely with the rest of the series when it’s done.
Love,
Adesina
xoxo

Hellooooo from the art studio 😀! I’ve been working hard and I wanted to share with you, a few behind the scenes clips, on a sculpture which is very nearly done – yay! 🙌💃
And for more videos and updates like this one, be sure to like and follow me on Facebook, at Facebook.com/ArtByAdesina
Hugs,
Adesina ❤❤❤
—-
¡Holaaaaa desde el estudio de arte 😀! Estoy trabajando mucho y quisiera compartir un video detrás de escena ¡sobre una escultura cual está casi completa! 🙌💃
Y para más videos y noticias como ésta, por favor siguenme en Facebook, en Facebook.com/ArtByAdesina
Abrazos,
Adesina ❤❤❤
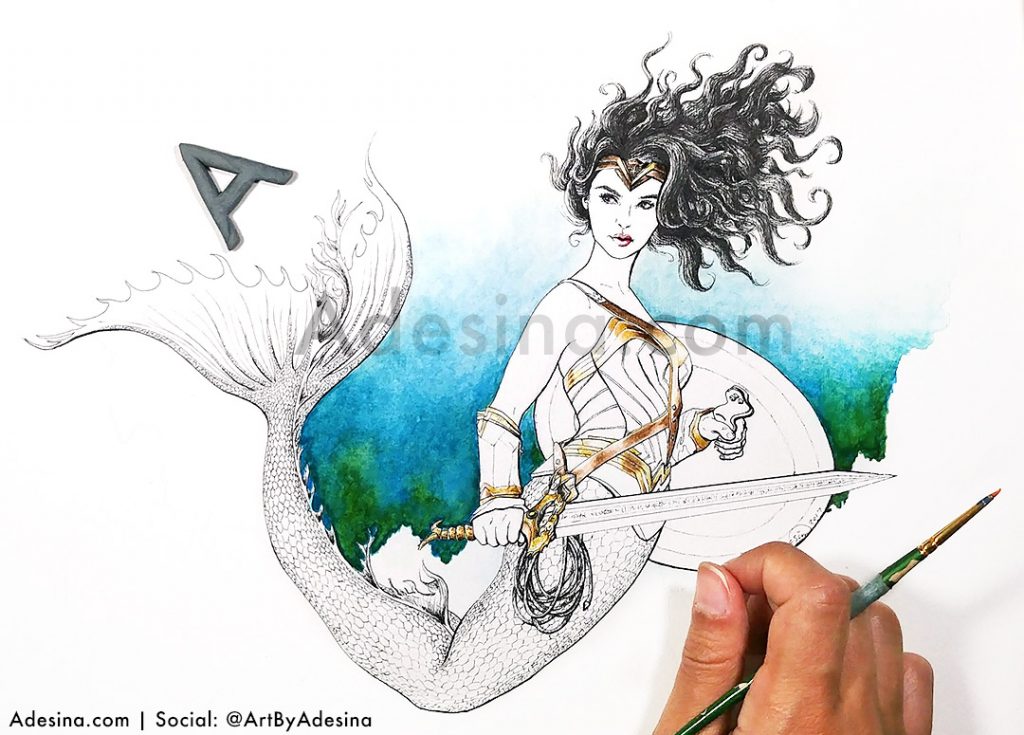
Happy MerMay!
So I started this drawing last MerMay, and even though I signed it, I never really felt I had finished it. So since May has swung around again, I thought I’d take it out and add some more color!
Here is last year’s post — Hit the right arrow to see the original progress video 🙂
And here’s an update from today! Check out the deep blues and greens of the water – What do you think? Should I add some coral to the sea floor?
I hope you guys like the picture so far, and stay tuned for a finished version!
Love,
Adesina
While I mull over the final finish for my latest sculpture, Objectification (I), I thought I’d put together a video of the process, to give a little glimpse into the weeks of hard work that even a small sculpture can take.
From molding the clay on the armature, to covering it in several coats of plaster to make a cast, to letting that dry only to dig out the original clay, and fill it with more plaster, to finally chipping away at the mould to reveal the final sculpture underneath, it is quite a journey!
I hope you enjoy the video and the process, and I can’t wait to share the final reveal when her patina is done.
(Read more about the meaning of this sculpture, here»)
Love,
Adesina

Adesina poses in the studio with her sculpture Objectification I
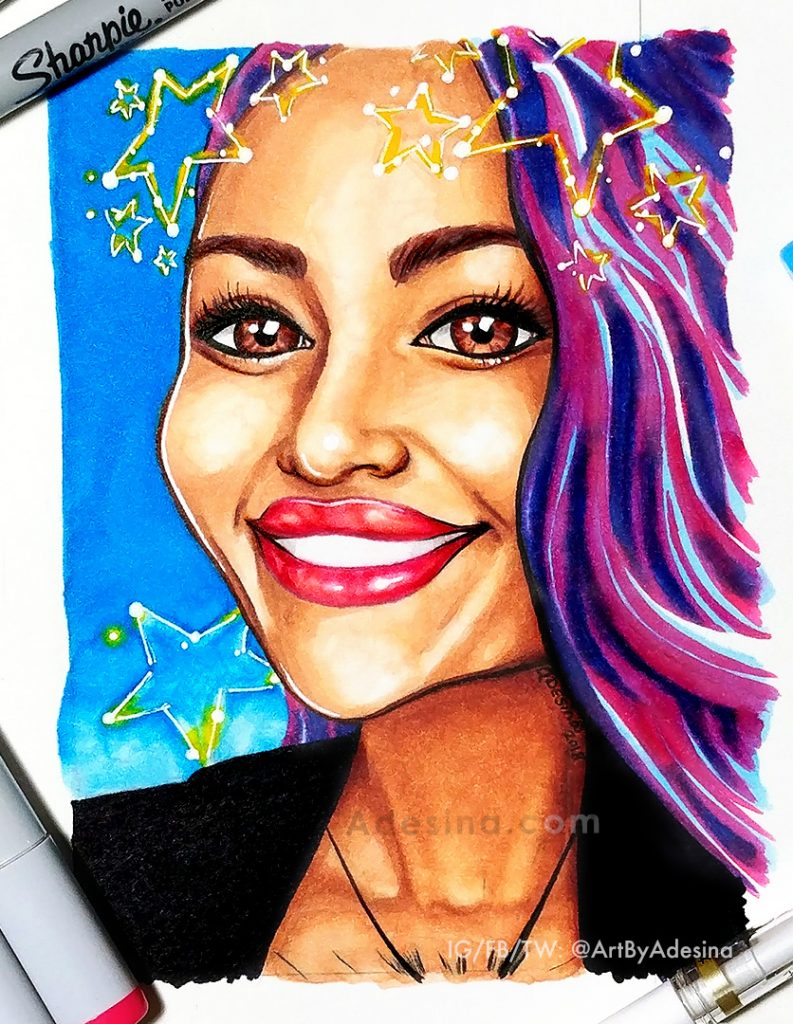
Above drawing: Cartoon Portrait of Star Ruiz by Adesina, 4.5″ x 6.5″. Copic Markers (all colored areas), Sharpie (large black areas), Sumiiro brush pen (black lines), white gel pen (white highlights), & watercolor (gray in eyes & teeth), on heavy weight drawing paper.
So I’ve been meaning to try out Copic Markers for the longest, and I bought a couple packs a few weeks ago, but I didn’t have a chance to open them up until now.
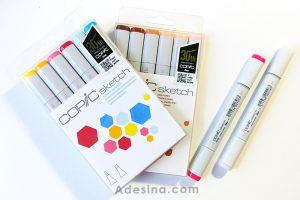
Copic Sketch marker sets – aren’t they beautiful? 😀
Well was I in for a treat! These markers are so much fun to use; nothing like the regular markers we all played with as kids. First, they blend really well – if you color in an area all at once, you get almost no streaking, and if you layer a light color right next to a dark color that is still somewhat wet, you can blend the edges together to create an almost watercolor effect.
In fact, that’s what I would compare them the most to: watercolors. Like watercolor, they also bleed through regular paper. I used pretty heavy drawing paper for my drawing, but the next page in my sketchbook still had lots of bleed through on it, so next time I will put a piece of scrap paper in between. Also, I noticed that any area you color bleeds a bit into the adjacent areas, especially if you are heavy handed, so in future I will not color right to the edge of my lines, but instead I will stop maybe a millimeter away, and let the bleed carry the color to the edge.
 Also, I discovered a few things about the colorless blender. I thought it was something I could use similar to the way you use the colorless blender pencil with Prismacolors: layer two colors one on top of the other, or side by side, and then rub the blender on top to make them one solid hue, or to create a seamless transition. Nope. The markers themselves actually naturally blend on their own. Layer colors one on top of the other and they will create a new color (and not always the color you anticipate either, so test it on scrap first lol), and as I said before, if you use one color right next to another that is still wet, they will also bleed into each other naturally.
The colorless blender is actually more like an eraser of sorts. You can use it the same way you would use a clean brush dipped in water, with watercolor. It can lighten colors, and I was even able to use it in order to clean up some edges where the markers bled excessively. But if you are too heavy handed it can also cause the paper to warp, and colors to bleed even more, so be careful.
Timelapse of my drawing:
And, similar to acrylic paints, these markers dry lighter than they go on. Which made it a bit confusing when I was trying to touch up some of the shading on areas that were already dry — it was hard to tell if I was actually making the area darker, or if it just looked darker because it was wet compared to the dry areas. I think in future I will try to only work wet into wet when I am shading, or at the very least, make a mental note of what colors I used where, so that I can either match the color, or pick the right darker color to shade it with.
And finally, I definitely understand now why people buy so many different colors. Although they do blend, the colors they create are not always intuitive and some unexpected results can happen. If you really want a specific color, you need to buy it, because chances are, you won’t be able to mix it perfectly with just the primaries. So I think I’ll invest in a few shades of gray, as well as some secondary colors, next :).
If you want to try out these markers for yourself, here are the ones I bought, below (I think the skin tones are sold out until May, but the primaries are avail now):
Copic Sketch Markers – Perfect Primaries
Copic Sketch Markers – Skin Tones
I also bought the colorless blender (Number “0”) and a loose marker, RV25 “Dog Rose Flower” which is a hot pink.
xo,
Adesina

Happy President’s Day! I hope everyone is enjoying the day off and reflecting on our nation’s history and how we can constantly improve, moving forward. In the words of President Kennedy, “Ask not what your country can do for you—ask what you can do for your country.”
I asked myself that question last month, and decided that the condition of our civil rights is one of the more urgent issues at hand in politics today. One of the many reasons I decided to start my “I Have A Dream” charity campaign for Black History Month.
And now, I’m so honored to share with you, that The Lifestyle Republic has picked up my story, and featured me this month in a video interview that delves into my past as an artist, and gets right into the thick of the current charity campaign.
Thank you so much for spending some time with me today, and if you would like to participate in the “I Have A Dream” project, and donate to the ACLU to help preserve our civil rights (100% of the profits go to the ACLU), please get an art card of your very own, for just $5, here on eBay.
Thanks again and have a great week!
<3 Adesina

It’s not often that I draw cartoons, but I promised some friends I’d create a special portrait of their little girls, and because they love Mickey’s Clubhouse, I thought I’d incorporate some familiar characters. 🙂
I’m really enjoying it and even made a mini speed-drawing for my Instagram followers. Check it out below and feel free to give me a follow for more art!
xoxo,
Adesina

It’s been a whirlwind couple of months, leading up to the gallery show, “I HAVE A DREAM – 50 Yeas of Change,” at El Taller Latino Americano, where I have been invited to display my multimedia tribute piece to honor Dr. Martin Luther King, Jr. It has been the most involved, collaborative, and intense art project I have ever done.
 The gallery opening was on Wednesday, July 24th, and in the weeks preceding I spent over 100 hours creating a painted portrait of Dr. King, based on screenshots from the videos of over 50 people, from all walks of life, who each generously took the time to recite one line from the speech to camera.
In addition, my piece, officially titled “I Have A Dream 2013,” (below, right) includes a video montage of all the submissions I received, and that video can also be seen at the gallery, on a tablet under my painting.

This entire experience has been so moving, and so time-intensive, that I am only now catching my breath enough to step back and appreciate what has been created, not just by me, but by the amazing people who believed in Dr. King’s dream enough, to lend their voices and faces to the project. I am ever in their debt.
The gallery show ends this Saturday, August 10th, so I invite all of you to feel free to come up to 104th and Broadway in NYC and see all of the amazing work before it closes. I am so honored, not only to be able to show alongside such esteemed and established artists such as Felipe Galindo, Martin Kozlowski, & Sylvia Hernandez; but also to be part of an exhibit curated by my wonderfully talented and gifted mentor, artist Andrea Arroyo.
Read Press: El Diario»
If you’d like to visit, gallery hours are Mon-Thurs 10-6, and Sat 10-1, and the address is:
The Grady Alexis Gallery – El Taller Latino Americano
2710 Broadway, 3rd Fl. New York NY 10025. 212-665-9460
It’s free to attend, and I hope you can make it, but either way, more is yet to come for IHaveADream2013.com – so stay tuned! 🙂
xoxo,
Adesina
Just a little over a week ago, I wrapped my yearly children’s art classes at Artistic Dreams International, and I can’t say enough how rewarded and blessed I feel, to see the changes that occur in these kids when their minds are brought into focus, and their eyes are opened up to their true potential.

Last year I taught an all-inclusive, basics-building drawing class that ranged from perspective to observation, from contour-drawing to self-portraiture, and it was fantastic! We packed so much within 3 short hours a day, that I knew each child found at least one lesson that they could really hold onto, and bring into their future art projects.
This year, however, I was informed that may of the children had shown an interest in learning more technically advanced drawing skills. Thus, I was inspired to take things up a notch, incorporate some mixed media, and truly challenge them.
Drawing Exercise: Photos-to-Drawings Picture Grids.
The results, from kids no older than 8 or 9, and some as young as 4 and 5 (not pictured here), speak for themselves:


Now, normally I’d recommend this exercise for kids ages 10 and up, but with help (especially with the grid construction), even much younger children can get something out of it. I took the liberty of making a video of how I created my own Picture Grid: this one I call the “Surrealist Half-Picture,” because much like in Surrealist art, most of the drawing is recognizable and fairly realistic, but I added a few unusual details (which the kids really enjoyed), to make it all my own.
I showed this video to the children at the start of class, and immediately I could see how it motivated them to get started!
As always, teaching was super fun, but two elements of the class stood apart as my favorites of the day:

1) That golden period where all the kids are eagerly bent over their work, hushed and focused on their pieces, happy & in their own little worlds.
And 2) That magic moment when a child is nearing the completion of their work, and they lean back from it, only to realize that – WOW! It actually looks like the picture! I remember this moment vividly for myself when I was a kid doing a grid exercise; it was one of the first times I realized I could really draw if I put my mind to it, and it was a tremendous self-esteem booster. It is deeply gratifying to see a new generation experience that same revelatory and positive feeling.
So what’s the takeaway? It’s this: Art Matters. Artistic Dreams educates young people with little or no access to the arts. Without ADI, many of these kids would never have the opportunity to learn from professional artists and uncover their hidden talents. Some of these children have learning disabilities, are monitored by case workers, or have trouble in school. In an academic setting, they may be labeled as different; or perhaps just as bad, they might be educated in a classroom so crowded, they receive no individual attention at all.

Not at ADI. The ratio of teachers to students can be as low as 1 to 3 (I had 3 teaching assistants myself!); every child receives individual attention; and every child is treated as though they are as competent and capable as all the others. For example, we had one student who was diagnosed with ADHD, and yet, they were able to sit quietly for over an hour, creating a beautiful, highly detailed drawing that any child would be proud to show a parent. Imagine if they could apply that same focus to a math problem or a reading passage? (Read my recent post: Art Education Matters»)
And I don’t take the credit for this. I may have designed the drawing lesson, but ADI has created a program that is truly unique: incorporating yoga, meditation, leadership skills, and accountability into the art curricula that art teachers like myself, bring to the classroom. I have never experienced anything like it — I was just as happy to learn yoga as the children were — and it is a model that I hope can be utilized in academic and extracurricular settings across the country, because it works!

I donate my time and art materials to ADI because they utilize art and music to transform the lives of students all over the world. It doesn’t matter if we reach 10 students or 10,000 – to me, it’s worth every penny and every effort. But of course, the more kids we can reach, the more lives that can be changed. If you want to learn more, please visit ArtisticDreams.org, or make a donation here», and help ADI expand its amazing outreach.
Special thanks to my fellow teachers, May Nazareno, Jake Menichino, Jessica Perilla & Ingrid Alvarez for helping to keep the kids engaged and focused; their presence was invaluable.
Thanks so much for reading, and until next time,
Adesina <3
